Most home cooks throw away the best part of dinner. You finish searing your chicken, you lift it out of the pan, and then you reach for the sponge. Those dark, sticky brown bits stuck to the bottom go straight down the drain.
That’s a mistake — because those browned bits are the most concentrated flavor in the whole dish. Restaurants don’t scrub them away. They turn them into a pan sauce. And once you understand how, you can do it after cooking almost anything: chicken, steak, pork, fish.
This isn’t a recipe to memorize. It’s a formula — five steps that always go in the same order. Learn the five steps once, and you can build hundreds of different sauces from the same technique.
The five steps
Every pan sauce, no matter how fancy the restaurant makes it sound, follows this path:
Fond → Aromatics → Liquid → Reduce → Finish
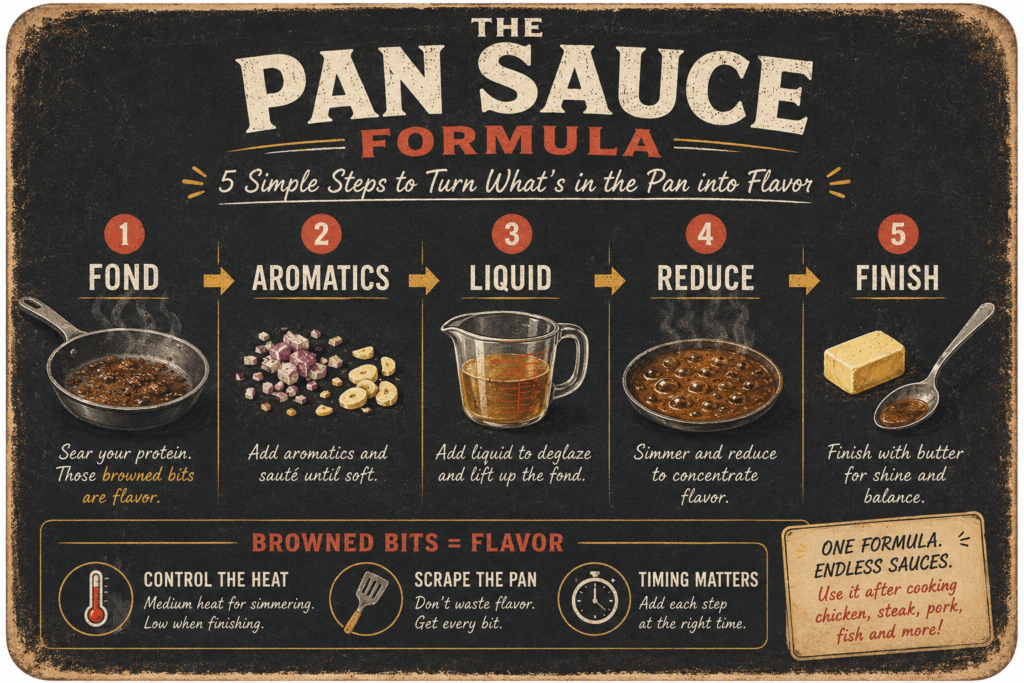
That’s the whole thing. Sear your protein to create fond. Soften aromatics for flavor. Add liquid to deglaze. Reduce to concentrate. Finish with butter for balance and shine. Let’s walk through each one and, more importantly, why each one matters.
Step 1: Fond — the flavor you’ve been throwing away
It starts before you even think about sauce. It starts with dry chicken and a hot pan.
Pat your protein dry with a paper towel first. This matters more than it sounds: moisture prevents browning, and browning is where the flavor begins. A wet surface has to boil off all its water before the pan can get hot enough to brown — and by then you’ve steamed your chicken instead of searing it.
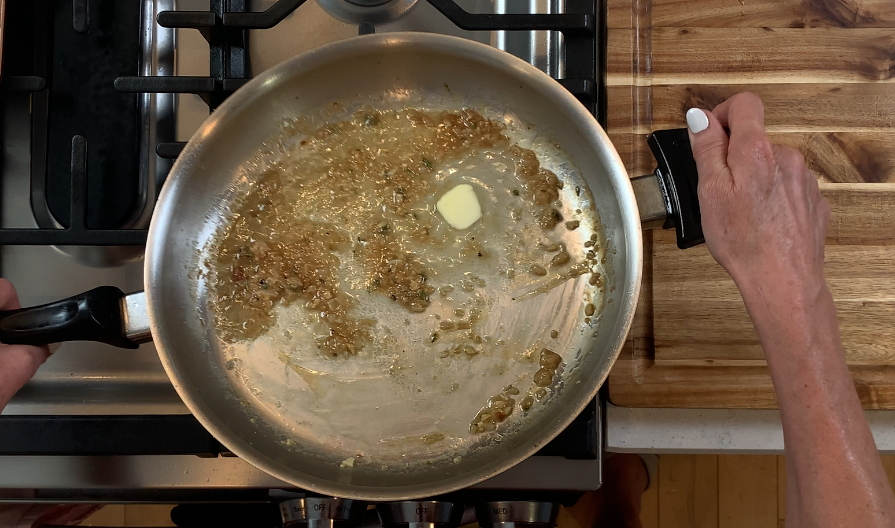
As the protein sears, it leaves behind dark, sticky bits welded to the bottom of the pan. That’s fond (French for “base” or “foundation” — and that’s exactly what it is). Fond is the browned, caramelized residue of proteins and sugars, and it is pure concentrated flavor. What you’re building here isn’t just cooked chicken. You’re building the foundation of your sauce.
Once your protein is deeply golden, take it out of the pan and let it finish cooking in the oven. — I’ve written up the full chicken thigh method, temperatures, and timing in a separate post — my full Chicken Thigh Method. For this sauce, all that matters is that you have a pan full of good fond.
Step 2: Aromatics — building the first layer
With the protein out and the pan still holding all that fond, lower the heat and add your aromatics. Tonight that’s a finely minced shallot, followed by a little garlic.
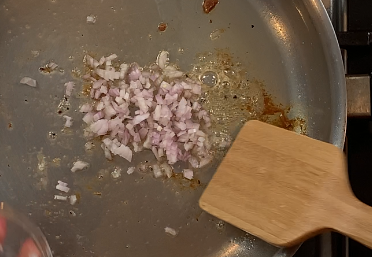
Lower heat is the whole game here. Don’t let the garlic brown — browned garlic turns bitter, and that bitterness will follow you all the way to the final sauce. You’re not trying to cook the aromatics hard; you’re just softening them and letting them release their flavor into the fat that’s already in the pan.
Step 3: Liquid — deglazing (the satisfying part)
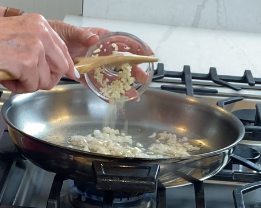
Now the liquid. Stock, wine, or even a splash of vinegar — pour it in and the pan will hiss and steam.
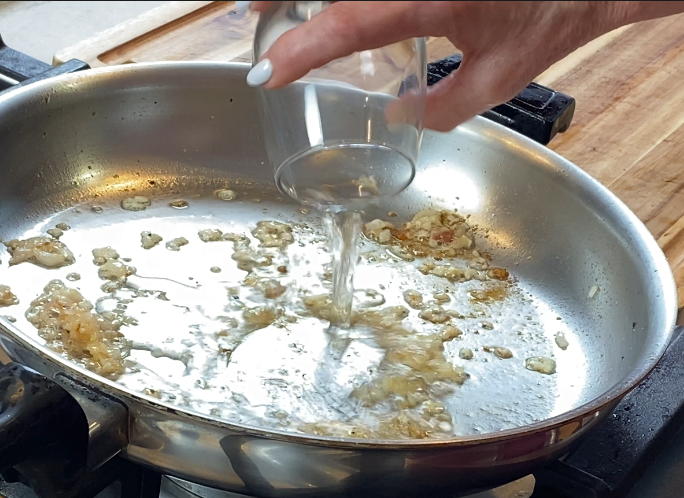
As it bubbles, scrape the bottom of the pan with a spoon. Watch what happens: all that fond that seemed permanently stuck dissolves and lifts right off, melting into the liquid. This step is called deglazing, but the fancy word hides a simple truth — what you’re really doing is dissolving all that concentrated flavor back into the sauce. Nothing gets wasted. Every bit of browning you worked for in Step 1 is now in the liquid.
A note on the liquid itself: stock adds body, wine and vinegar add brightness and complexity. Even a tablespoon of something acidic changes the whole character of the sauce.
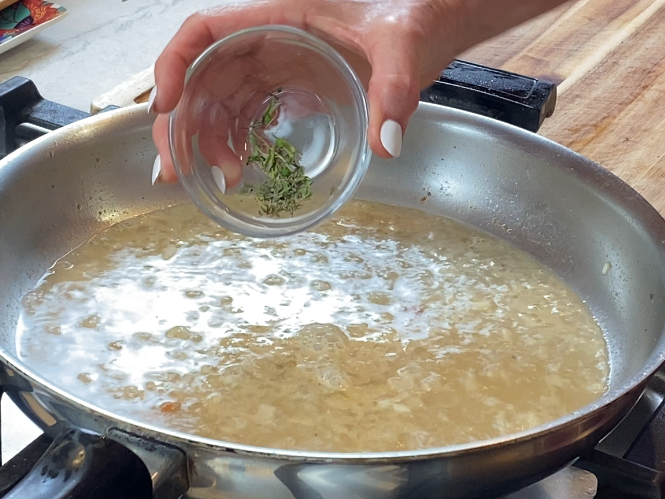
This is also the moment to add a hardy herb like thyme, so it has time to simmer and infuse its flavor into the liquid rather than just sitting on top.
Step 4: Reduce — where the sauce actually becomes a sauce
This is the step beginners skip, and it’s the one that matters most. After deglazing, you have a thin, watery liquid in the pan. Let it simmer.
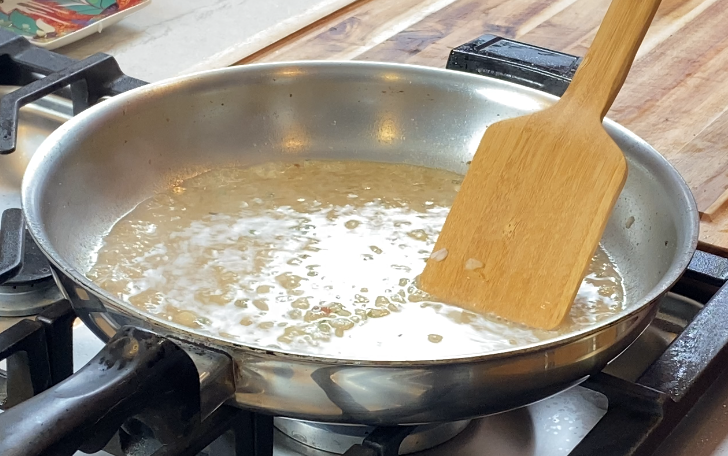
As it simmers, water evaporates. And as the water leaves, three things happen at once: the flavor concentrates, the taste is amplified, and the sauce gains body — it goes from watery to something that can actually cling to food. This is reduction, and it’s pure physics. You’re not adding anything. You’re just removing water so what’s left behind is more intensely itself.
Be patient here. It’s worth it. You’re looking for the sauce to thicken slightly — not the heavy, clinging coat of a cream sauce, just enough body to lightly coat the back of a spoon and, eventually, the chicken. The moment it does that, you’re ready for the final step.
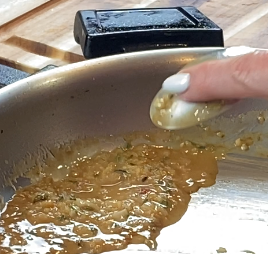
Step 5: Finish — butter for shine and balance
With the sauce reduced, lower the heat and swirl in a tablespoon of cold butter.
The temperature of the butter matters, and here’s the why: cold butter melts slowly and emulsifies into the sauce — meaning the fat disperses into tiny, stable droplets throughout the liquid instead of separating out. The result is smooth and glossy. Butter that’s too warm, or added over heat that’s too high, breaks instead of emulsifying, and you get a greasy slick on top rather than a silky sauce. The gentle swirling motion is what coaxes it together.
Butter does two jobs at once: it softens any sharp edges in the sauce, and it gives you that glossy, silky, restaurant-quality finish you can see catching the light.
The final touch: acid
Taste it. If it tastes rich but somehow flat — like something’s missing but you can’t name it — that something is almost always acid. A small squeeze of lemon wakes the whole thing up.
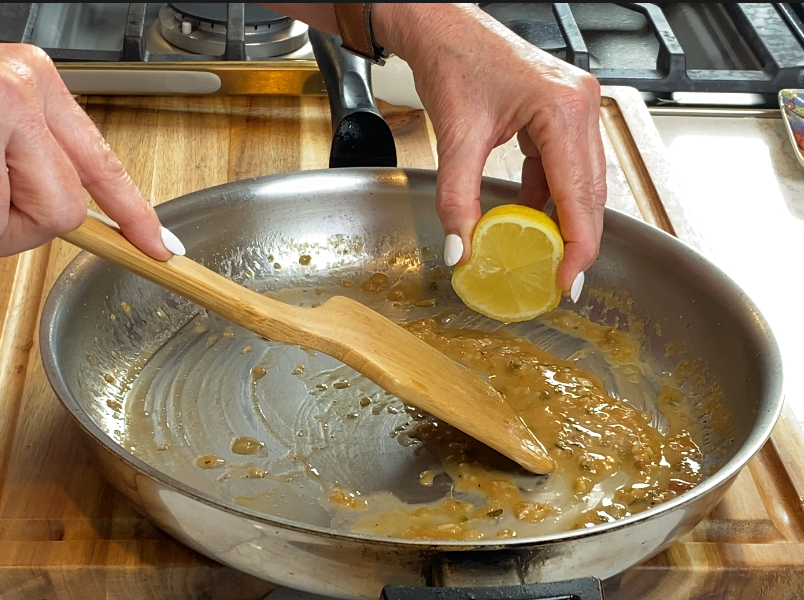
Here’s the part that surprises people: the lemon doesn’t make the sauce taste lemony. Used in a small amount, acid makes the sauce taste balanced. It lifts and sharpens every other flavor that’s already there. One squeeze can be the difference between a sauce that’s good and a sauce that’s complete.
That’s the whole formula
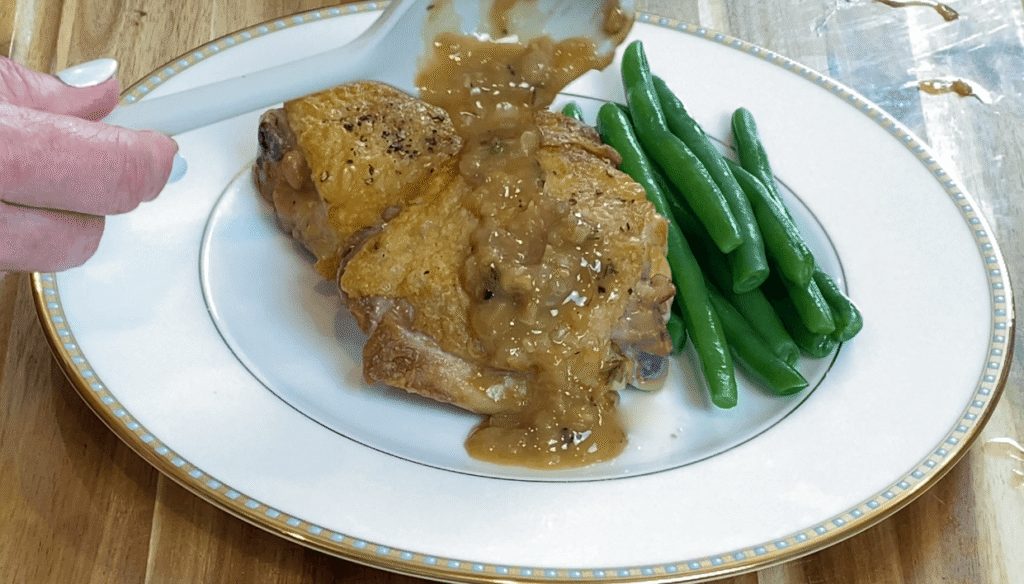
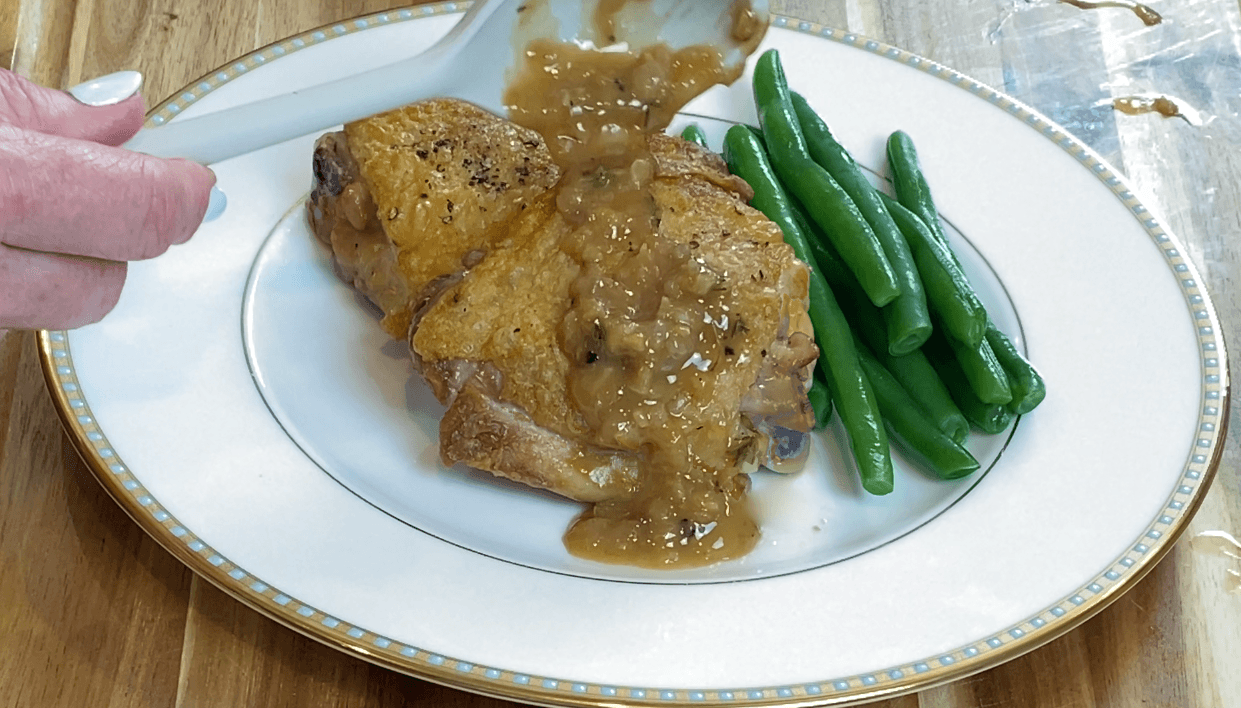
Spoon it over your protein and look at it: deep yet bright, glossy, balanced, finished. That’s the difference between just cooked chicken and a finished dish.
And here’s the payoff. You didn’t memorize a recipe — you learned a formula. Swap the chicken for steak and the stock for red wine, and the same five steps give you a steakhouse red wine reduction. Swap in pork and apple cider. Fish and white wine. Fond → Aromatics → Liquid → Reduce → Finish. Once you understand why each step works, you’ll never need a recipe to make a good pan sauce again.
Want to watch the whole thing come together? The full video is here. And if you’re cooking the chicken I used as the base,here’s my bone-in chicken thigh method.
The Pan Sauce Formula
Ingredients
Method
- Step 1: Start with good fond. After searing your protein until deeply golden, remove it from the pan. The dark browned bits left behind are the foundation of your sauce — don't wash them away.
- Step 2: Lower the heat, then add the minced shallot. Cook gently until softened, about 1 minute. Add the garlic and stir for 30 seconds — do not let it brown, or it will turn bitter.
- Step 3: Deglaze: pour in the stock and wine. As it bubbles, scrape the bottom of the pan so the fond dissolves and lifts into the liquid. Add the thyme sprig.
- Step 4: Reduce. Let the sauce simmer until it thickens slightly — just enough to lightly coat the back of a spoon, about 3–5 minutes. Be patient; this is where the flavor concentrates.
- Step 5: Finish off the heat (or very low): swirl in the cold butter until the sauce turns glossy and smooth. Add a small squeeze of lemon, taste, and adjust. Discard the thyme sprig, garnish with parsley if using, and spoon over your protein.
Video
Notes
FREQUENTLY ASKED QUESTIONS
Can I make a pan sauce without wine? Absolutely — wine is one option for the liquid, not a requirement. Stock alone works beautifully and keeps the sauce family-friendly. A splash of vinegar, apple cider, or even a little cream can stand in depending on the dish. The formula cares that you add liquid to deglaze and lift the fond; what that liquid is, is up to you.
What kind of pan do I need for a good pan sauce? Stainless steel or any uncoated pan that browns well, because the whole sauce is built on fond — the browned bits stuck to the bottom. Nonstick pans are the one to avoid here: they’re designed to prevent exactly the sticking that creates fond, so you’ll have little to deglaze. Cast iron and stainless both build fond beautifully.
Why is my pan sauce greasy instead of glossy? The butter broke instead of emulsifying, almost always from too much heat or rushing it. Lower the heat or pull the pan off entirely, add the cold butter and swirl gently rather than stirring hard. If it’s already split, a splash of stock and steady swirling can often pull it back together. Keeping the heat low at the finish is the best prevention.
Can I use this formula with steak, pork, or fish? Yes — that’s the whole point of learning it as a formula instead of a recipe. The five steps don’t change; only the details do. Steak with red wine becomes a steakhouse reduction, pork pairs with apple cider, fish with white wine. Master the sequence once and you can build a sauce after searing almost anything.
Do I have to use fresh herbs? No, but add them at the right moment. Hardy herbs like thyme or rosemary go in during the reduction so they have time to infuse the liquid. Delicate herbs like parsley or chives are best stirred in at the very end or used as garnish, since heat dulls them. Dried herbs work too — use about a third as much, since they’re more concentrated.
More from the science of sauces series
This is the foundation post for the Pan Sauces series — the five-step formula every pan sauce in this series is built on. Once you understand fond, aromatics, liquid, reduction, and finish, the rest is just changing the variables.
Episode 5 — The Sauce That Makes Steak Taste Like a Steakhouse: The same five steps with red wine and beef stock — a classic steakhouse reduction for steak.
Episode 6 — Lemon Caper Pan Sauce: The formula taken bright and zesty, with the trick to keeping three sources of acid balanced instead of sour.
For new episodes the moment they go live, subscribe to Cream and Cloves on YouTube — that’s where every recipe in this series starts as a video.